
Posted by  :
Talha Suleman
Saturday 6 September 2014
:
Talha Suleman
Saturday 6 September 2014

Before we start be sure to either practice these changes in a test blog or backup your template before starting.
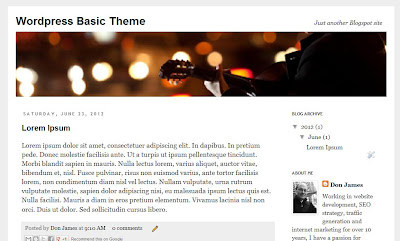
Adding a Banner Image to the Wordpress Theme
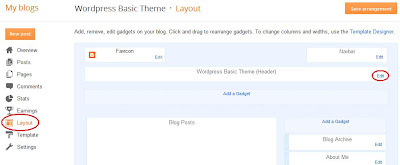
Ok, from Part 1 we were ready to add the banner across the top of the template. I'm not going to go into a deep tutorial on how to create and format a banner image other than to say you need a .jpg (JPEG) or .png (Portable Network Graphic) image that is formatted to approximately 940x165 pixels ready to go.To add a banner in Blogger is simple - just access your template's layout using the main menu 'Layout' selection and press the 'Edit' link in the 'Header' section like this:
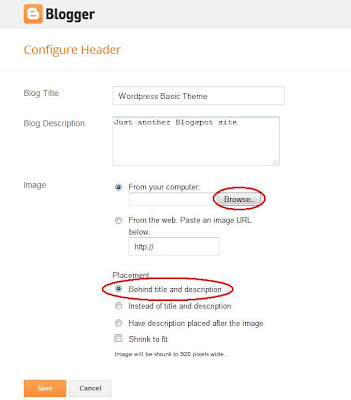
Once you're in the edit dialog, select your banner image from wherever you saved it on your hard drive using the 'Browse' button. Be sure the 'Shrink to fit' option is not selected:
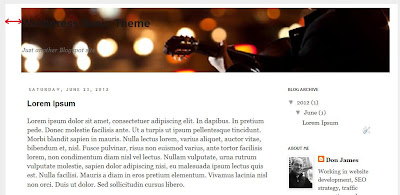
Things are going to look a bit odd at this point - the first reason is that your banner may not be exactly 940 pixels wide - the second reason is that the Blogger title and description are located within the image. Don't worry, we'll adjust the template width and title later. However, we need to customize the CSS to reduce the padding around the template (which I highlighted below with the red arrows). Here's what the template looks like so far:
Jump back into the Blogger Template Designer ('Advanced' menu item - review Part 1's post to find it) from your main menu to add some custom CSS code like we did yesterday. We want to set the blog's inner padding ('.content-inner') to about 20 pixels like this:

The left side of your blog should look proportionally good - however, the right side might be off due to the blog width. Stay in the Blogger Template Designer and select the 'Adjust widths' option to alter the full width of the 'Entire Blog' so that the right side margin/padding looks aligned with the left (note that I also adjusted the sidebar width a bit:

At this point your template should have a good banner image with the appropriate widths set.
Adjusting the Blogger Template HTML Code
Now comes the hard part. As you noticed earlier the blog's title and description fields are now located within the image itself. We need to move these above banner. I thought some simple CSS code might do it - but, I haven't found a good way yet. So, we're going to move some of the template's HTML around a bit and add a couple of CSS formatting commands.First let's jump into the template's HTML code. Go back to the blog main menu and choose 'Template' and 'Edit HTML' button:


Before you do anything click on the checkbox named 'Expand Widget Templates' as shown below. You are going to be searching for the HTML code where the banner is actually rendered.
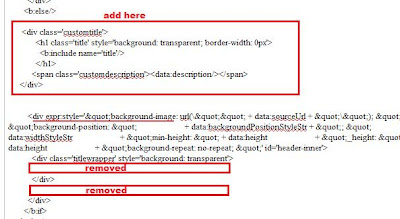
In the HTML code, do a search from your browser using the Crtl-F key to find the following string "div expr:style='"background-image". You should be able to find it - if not, try manually searching for it - you should find it about one third of the way down the template:


If the preview worked ok, then the next step is to add the following code to the template just about the search text we found - here is the code we want to add:
<div class='customtitle'>
<h1 class='title' style='background: transparent; border-width: 0px'>
<b:include name='title'/>
</h1>
<span class='customdescription'><data:description/></span>
</div>
<h1 class='title' style='background: transparent; border-width: 0px'>
<b:include name='title'/>
</h1>
<span class='customdescription'><data:description/></span>
</div>
Find the search string again "div expr:style='"background-image" that is just above the sections we removed. We're going to paste the code just above this line like so:
Press the Preview button to make sure the code works - here's what you should see!

Now the title and description are positioned out of the image boundary. The last step for this part is to position those elements correctly using some CSS code in the Blogger Template Designer ('Advanced' menu item) again. Just add the CSS code in the image to position the title and description correctly. You might have to tweak the description left distance a bit:

A bit of work - but, take a look at the template now - it's really coming together:
Next up, the final settings for the sidebar and highlighting modifications. Enjoy!


.png "#caption3")
.png "#caption4")
.png "#caption5")
.png "#caption6")
.png "#caption6")
.png "#caption6")
.png "#caption6")
.png "#caption6")

.png "#caption6")
.png "#caption6")
.png "#caption6")
.png "#caption6")
.png "#caption6")